
There are those spring days when the sun is hidden somewhere, maybe it rains outside and you have to rediscover the pleasure of your faithful cozy sweater and a hot cup of tea.
Not so bad, I love this autumn atmosphere!
Especially in company with a dear friend, eating, talking, eating, laughing, eating, talking, talking and creating!
If you follow me on Instagram, you've already seen a preview of our funny afternoon, now a step-by-step post to make your own handmade elastic hair!
Thank you Alessandra for teaching me something new!
//
Ci sono quei giorni primaverili in cui il sole è nascosto chissà dove, fuori magari piove e dovete riscoprire il piacere del vostro fidato caldo maglioncino e di una tazza di tè bollente.
Non così male, amo l'atmosfera autunnale!
Specialmente in compagnia di una cara amica, mangiando, parlando, mangiando, ridendo, mangiando, parlando, parlando e creando!
Se mi seguite su Instagram, avrete già visto un'anteprima del nostro divertente pomeriggio, ora un post step-by-step per realizzare il vostro personale elastico per capelli fatto a mano!
Grazie Alessandra per avermi insegnato qualcosa di nuovo!
***
You need // Vi occorre:
- Needle. // Ago.
- Scissors. // Forbici.
- About 40x10 cm (15,7 x 9,3 inches) of fabric, be inventive and choose your fave! // Circa 40x10 cm di tessuto, siate creative e scegliete il vostro preferito!
- Sewing thread that matches with the fabric shades. // Filo da cucire che si abbini alle tonalità del tessuto.
- About 10 cm (3,9 inches) of elastic band and a safety pin you'll pinch at one of elastic's extremities. // Circa 10 cm di elastico ed una spilla da balia che attaccherete ad una delle sue estremità


How to // Come procedere:
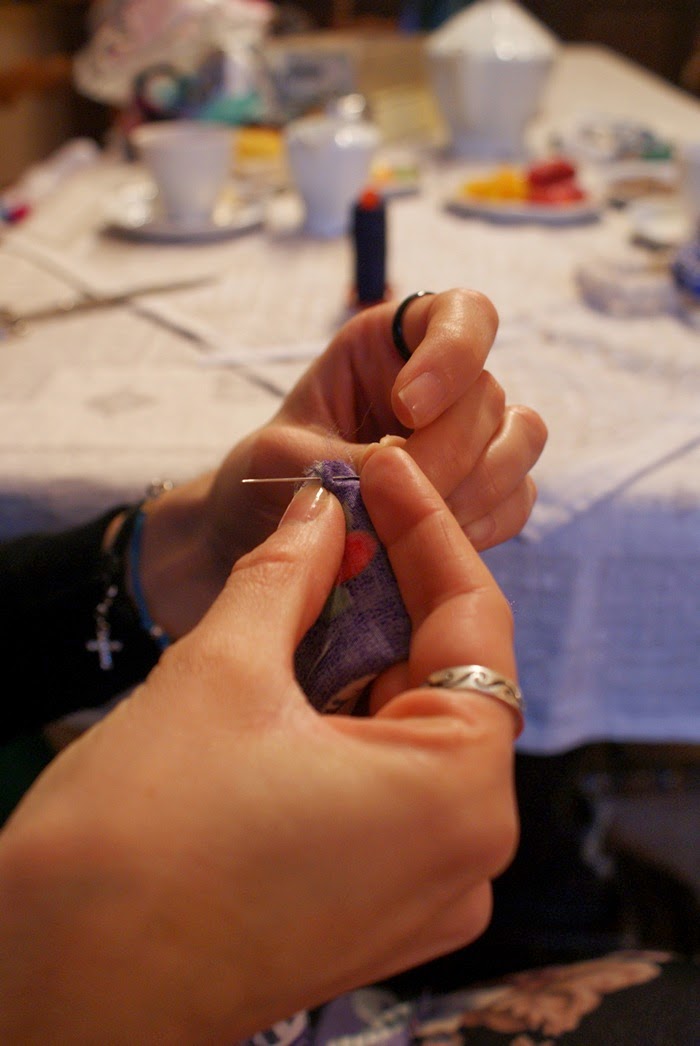
1)
Start bending the fabric on the contrary to have corresponding sides. Alessandra already did it! // Iniziate piegando il tessuto al rovescio in modo che i lati combacino. Alessandra l'aveva già fatto!

2)
Pull out your sewing ability and grandmas' teachings, fixing the thread with a knot and proceeding sewing along the fabric, to attach its separate tails. // Tirate fuori la vostra abilità nel cucire e gli insegnamenti delle nonne, fissando il filo con un nodo e continuando a cucire lungo il tessuto, per tenere insieme i suoi lembi separati.

3)
Your stitches should look like these, it's not important they're perfect, but that the fabric remains sewn. // I vostri punti dovrebbero apparire simili a questi, non importa che siano perfetti, ma che il tessuto rimanga cucito bene.

4)
Don't sew the final part of the fabric but turn it over, revealing its front. // Non cucite la parte finale del tessuto, ma rigiratelo, rivelandone il davanti.

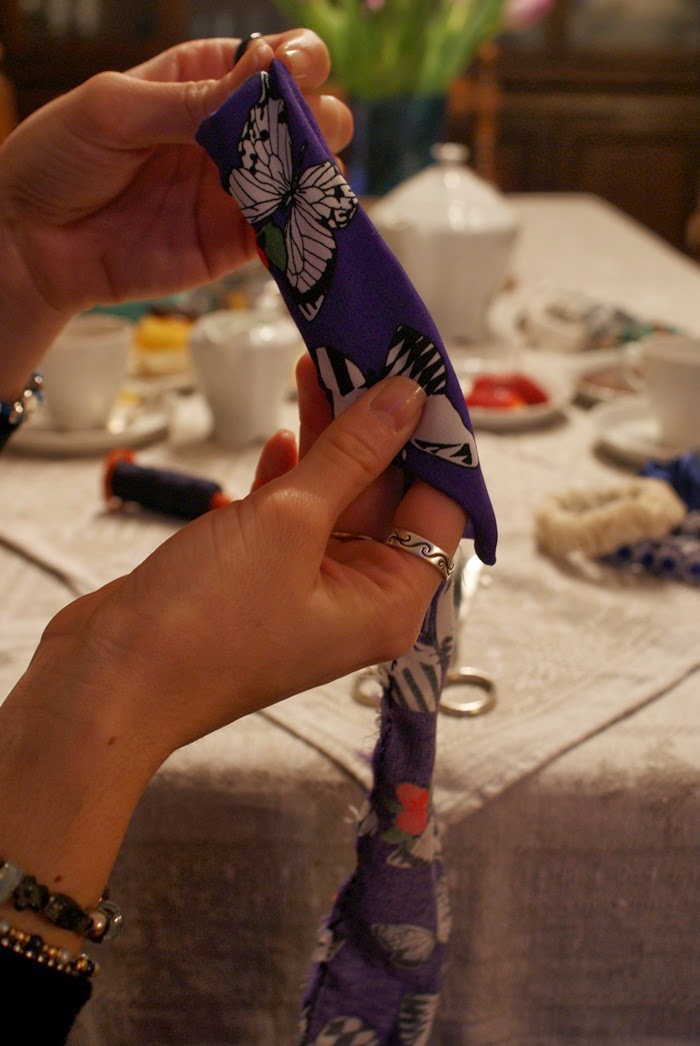
5)
If it looks like this, you're on the right road. // Se vi appare così, siete sulla giusta strada.

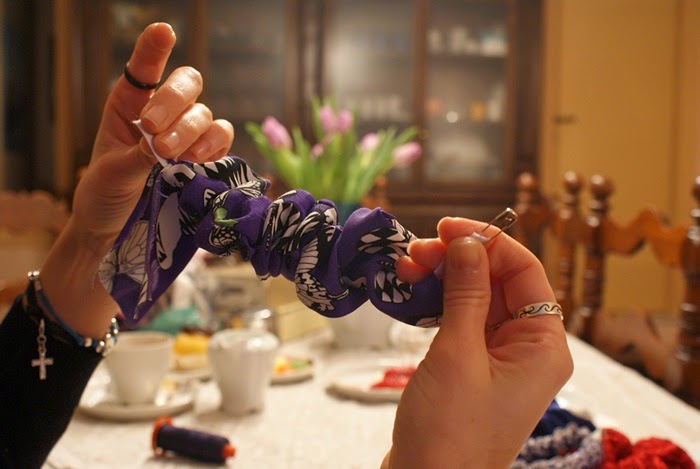
6)
Now instert the elastic band into the fabric, on the side with the safety pin. // Ora infilate l'elastico nel tessuto dalla parte della spilla da balia.

7)
The safety pin will help you to insert the whole elastic band into your fabric, as long as you'll have elastic's extremities out, one for side. // La spilla da balia vi aiuterà ad inserire l'intero elastico nel tessuto, finché entrambe le sue estremità non saranno fuori, una per lato.

8)
Pin elastic's extremities together, then start sewing them as thick as you can. // Pinzate insieme le estremità dell'elastico con la spilla da balia, poi iniziate a cucirle con punti più fitti che potete.


9)
Cover one side of the fabric with the other. // Coprite una parte del tessuto con l'altra.

10)
Wrap the higher part on itself to create the hem. // Arrotolate la parte alta su se stessa, per creare l'orlo.

11)
Sew the hem and fix the extremities of the fabric. We have almost finished... // Cucite l'orlo e fissate le estremità del tessuto. Abbiamo quasi finito...

12)
Et voilà! Your piece is ready to be worn! // Et voilà! Il vostro accessorio è pronto per essere indossato!


Magic! They've increased! // Magia! Si sono moltiplicati!

...and my personal one! // ...ed il mio personale!

Easy and nice, not? And when you become more expert, you can create elastics hair in every color or fabric you like! In the last pic I'm wearing my fave, cream broderie anglaise. I simply love it! Thank you again Alessandra for your collaboration!
If you are interested about her projects, write me an email at francinesplaceblog@gmail.com and I'll give you her contact! // Facile e bello, no? E quando diventerete più esperte, ne potrete creare in ogni colore o tessuto che vi piace! Nell'ultima foto io indosso il mio preferito, in pizzo sangallo color crema. Lo adoro! Grazie ancora Alessandra per la collaborazione!
Se siete interessate alle sue creazioni, scrivetemi una mail a francinesplaceblog@gmail.com e vi darò il suo contatto!
Happy weekend! // Felice weekend!
xx
Che belli!
ReplyDeleteFede
Quanto tempo c vuole a farne 1? Cmq bellissimi e bel blog XD
ReplyDeleteGrazie! @Anonimo: Guarda, mangiando, chiacchierando e pauseggiando (parecchio) ci abbiamo messo un'oretta circa, ma noi siamo un caso a parte :D una mezz'ora basta e avanza per farne uno, probabilmente anche un poco meno :)
ReplyDelete